Saturday, November 27, 2010

Circular Knitting Needle Storage Binder Tutorial

I have created many ugly storage methods for my circular knitting needles, but most of the time my storage involves shoving them on my shelf in a pile and hoping they stay there.  I was reading that some people have used tackle binders from the fishing section to store theirs.  This basically involves a binder with stronger zipper bags for the needles inside.  Well, being the cheap frugal person that I am, I decided, "I can make one of these myself instead of spending 20 bucks on a binder full of ziplock bags!"  And so I did:

Materials:
Spare binder (9" high by 3" thick) or the size of your choice)
3 sheets of matching scrapbook paper
Clear rubber stamp letters, an acrylic block, and ink
about 3 feet of ribbon (optional)
hot glue gun
large glue stick (you will need a lot!)
ziplock bags
hole punch
heavy book (optional)
Sharpie Marker

To begin, I turned my plastic baggies so that the zipper size was on the right.  I used my Crop-a-dile II to punch holes about 1 inch in on the left side of the bag (the bottom, actually, but since the zipper is on the right I'm calling it the left), if that makes sense.


Next, I labeled my bags with a sharpie, in large, black numbers. It was actually easier to punch holes in the bags after I put the needles in them, because they helped to align the front and back sides of the bag for even holes.

Next, I glued my scrapbook paper over the ugly brown cover.  First glue the back cover page like this:


Next, I folded the right side in and glued it down.  You need to coat that baby in glue stick!  A bone folder would work well in this instance, but I don't have one so I just tried to do a straight fold.  Next, I folded the corners down before I glued down the top and bottom. 
So now you should have this:

Next, you will do this with the front cover side, but when you align the scrapbook paper up with the binder, make sure the edge of the paper is at the edge of the back cover crease.  This will make for a (somewhat) cleaner book spine that people will see when this sits on your bookshelf.

Fold and glue the edges as done on the opposite side.  At this point, I was looking at the inside of the book and decided I needed to cover the ugly brown on the inside as well.  I just cut pieces of scrapbook paper to cover the inside of the covers and glued it down.  Don't ask me for measurements; I eyeball everything!


At this point you will want to set a heavy book on your front and back covers (while the binder is lying open), so that the glue can properly dry.  Once it is dry, arrange your lettering on your stamp block: 

You know what to do now:

Notice the line on the left side of the spine.  I tried (unsuccessfully) to hot glue this down better, with little success and a lot of glue burns.

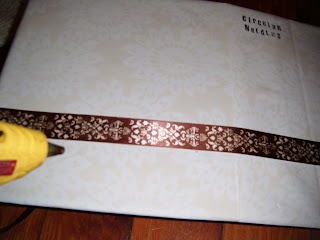
I decided that the binder needed more decor, so I added a length of satin ribbon across the bottom.    Start by gluing the center of the ribbon by a small dot in the middle of the spine.  Draw a line from the outside edge back to the center with a ruler, and put glue over the line.  Holding the ribbon taut, gently lay the ribbon onto the glue and pat it down.  do NOT slide it, or you will end up wasting a section of expensive ribbon because it will get "wavy."  Rinse and repeat.   If you did it right, it should look like this:

And on the inside, it should look like this:


Now, since I made this cover with the binder lying flat (no wrinkles!), I had to set a book on it to get it to stay closed.  Let a heavy book sit on it overnight and you will wake up to beautifully organized circular knitting needles!


Tuesday, November 23, 2010

Art Degree =/= Graphic Designer

So, my two whole subscribers, if I may be so presumptuous as to assume you have been viewing my blog, you have seen my sad attempts at web design in learning how to customize the Blogger layout.  Fortunately, with the power of Google, I was able to fix it a little bit!  I am still having issues with text showing up over background images (as you can see to the right), and other minor things, as well as my perfectionism in terms of finding the perfect fonts to fit the style, etc.  Anyway, please consider this my apology for the massive amount of changes that have happened here.  Hopefully it will be over soon, and I will find something I can live with!  Please, please, provide suggestions, criticism, input, rants, praise, etc. in the comments section of this post.  I welcome criticism. 

Just sayin...

$148.00 plus cartridges


OR...


$5.89


Kitchen Shelf Makeover

So I'm currently in between jobs, since the family I worked for is moving away (*tear*), but I have decided to use this time to get the house in order, using as little money as possible.  I was lucky enough to come across these at my local dollar store for a buck-fifty each:

I bought one of them, and I liked it so much that I went back and bought five more.  Tonight, I was sitting and staring at them, trying to figure out what to do, when I remembered this ugly black shelf I had hanging in my kitchen:


I love how sturdy and functional this shelf is, but the black clashed horribly with the rest of the room and it kind of stuck out like a sore thumb.  Thus, I made this:
I drink a lot of tea (especially peppermint!), and I had boxes of it accumulating on this shelf when it was hanging in the kitchen, but it was definitely not attractive with the clashing boxes and the clutter.  Don't be fooled by the photo; the rest of my kitchen looks like crap.

Materials:
glue stick
small metal canisters or any canister of your choice
shelf
latex paint
sandpaper
computer/ printer/photoshop or paint

The label I found via Google image search is from Lovemanor's Flicker page, and you can download it Here.
Here is the original label before and after my minor editing (castellar font):

before editing

after editing
For those of you who don't feel like editing, I have included a PDF printable set of labels with flour, coffee, sugar and tea labels for your own canisters.  You can download them here.

After that, I simply printed the labels out (all on one sheet to save paper), and I carefully cut them out with scissors because I didn't feel like digging out my exacto knife it was easier. 
The next part is pretty self-explanatory:  cut it out.  glue it on the jar.  Voila.   Oh, and I painted that ugly shelf white after I lightly sanded it.  Sanding it allows the paint to stick better and gives you a more even coat.  I am impatient, so I slapped 3 coats of paint on in about 2 hours.  You should wait longer.  I'm arguing that it adds to the "shabby chic" look I was going for.

Now fill your jars and put them to use!

ignore the wax paper under the jars, I didn't want to wait for the paint to dry to get the photos.
I may go back and sand the edges so the black will show through a bit, but I struggle to get the right balance of clean lines and "shabbiness to my chic," if that makes any sense.

Wednesday, November 10, 2010

Wedding Decoration Banner Tutorial

Hi all,

I've been busy.  Verrry busy lately!  I'm working on making my doily bowl centerpieces and all other things wedding, as inexpensively as possible.  This means I'm utilizing my local dollar stores and I've been going over them with a fine-toothed comb to find just the right balance of economical and "not-dollar-store-ish."  I wanted some type of garland-banner to hang around my wedding reception area.  I'm also trying to combine Stefan (the fiance)'s love of literature and my love of art in subtle ways that aren't kitchy.  Hence, the book garland. 
(Please excuse the messy house background.  Like I said, I've been immersed in crafts!)

Materials:
Book from the dollar store (Dollar Tree has an abundance of books, surprisingly good selection!)
Heart-shaped paper punch 
Twine (preferably not the scratchy, splintery type, but that's just my preference)
Paper cutter or scissors, if you are patient
Glue sticks
Wax paper (optional for cleanliness)

First, disassemble your book.  Tear off the front and back cover and tear off as much of the actual binding material as you can, until you get down to the pages.  At this point they are still all connected.  Take 5-10 pages at a time and tear off the full pages of the book.  Using your paper cutter, cut into even sections (since my book was 9 inches on the longest side, I cut three sections, three inches wide each.  At this time, if you haven't yet, you need to separate your pages into individual pieces of paper.  It is kind of like tearing pages off of a small notepad.  Remove the excess book binding material by just pulling it off.  It should come off cleanly. 


Once you are sick of cutting paper, start folding those pieces in half width-wise.  Then take your folded papers (one at a time), and turn it so that when you look at the edges of the folded paper, the crease is at the top and the open end is at the bottom.  Then use your heart-shaped punch to punch out a heart shape in the paper, being sure to punch through both sides of the fold at once.  Rinse and repeat.


Now you need to unwind some of your twine and lay some wax paper on your workspace.  Keeping your punched papers at the same orientation described above (the hearts should be right-side up), unfold one paper and put glue on the whole thing (I like things to be secure!).  Leave about a 10-inch tail and lay your twine across the crease you see inside the paper.  then you fold the paper back together, trying to match up the hearts as closely as possible.   Repeat this process, spacing the "flags" about a "flag-width" apart from each other.  You can space them how you like, but I hate measuring things, and this was an easy width to estimate. 


Now you may lay the banner out to dry and clean up your mess--but WAIT!  Don't throw away your heart-shaped clippings you have strewn about you.  I plan to scatter them down the aisle as decoration, and put them around centerpieces at the reception.  You could also use it as confetti to throw in lieu of rice.  Enjoy!

Tuesday, November 9, 2010

Wedding Centerpiece Tutorial

While I usually spend my time knitting, I have been busily working on my DIY barn wedding, scheduled for September 10, 2011 (9/10/11).  I know, it probably seems ridiculously early to be working on this stuff, but when I say DIY, I mean seriously, hardcore, insane-that-someone-has-time-for-this DIY.  Perhaps you might think I'm a bit of an overachiever, but I'm actually just a control freak   really frugal.  This first tutorial is for one of my centerpieces, which I first saw over at Wedding Gawker, which led me to Songbird's version of this project.  Songbird's bowl is made from plaster, which dries white.  However, I wanted to use ivory doilies, so I had to modify this project a lot, hence the seperate tutorial.  Enjoy!


Materials:
Cotton doilies, 10"
Fabric Stiffener (available at craft stores)
Bowl or dish smaller than your doily (I took my doily around the store and draped it over dishes until I found one that looked good)
Wax Paper
Plastic sandwich bag with zip closure
rubber gloves (optional)


I was lucky enough to find these 2-packs of cotton doilies at my local dollar store.

First, you want to lay out a piece of wax paper over a flat workspace.  Place your bowl/dish upside down on the wax paper. 

Open your zipper bag and add about 2tbsp of fabric stiffener to the empty bag (just eyeball the amount).

Add the doily, and add more fabric stiffener (about twice as much as you added before the doily).  Now you need to squeeze out the air and close the bag. 

Knead the bag until the doily is thoroughly saturated.  It should be tacky and moist in all areas. 

If you are using ivory doilies, you will notice the doily is white where it is saturated, so it is easy to tell when it is ready.

Take the doily out of the bag, squeeze excess stiffener into the bag (if necessary), and drape the doily over your bowl.  You should be able to center it easily, given the patterns in doilies usually have a center hole.  Again, this does not have to be perfect.  Part of the charm is that every one of these comes out different!

You will see that your doily wrinkles around the sides.  If you still like a little symmetry, make sure these wrinkles don't all end up in one spot.  pinch the doily on the other side of the bowl to evenly spread the excess fabric.  This also ensures that the finished product will not tip over from uneven weight.


The bottle of fabric stiffener I used recommended allowing 24 hours for the doily to completely dry.  I only needed 12 hours, probably because Michigan in November tends to be very dry.  You will know it is ready when the color is uniform, and the doily has a very "crunchy" feel to it.  When completely dry, pry your doily off your bowl (carefully!), and set it right side up to allow the inside to finish drying if necessary. 


Add decorative items into your dish as you see fit, and enjoy!